A technical SEO audit is the single most effective way to uncover hidden issues that silently tank your search visibility. Most digital marketers focus heavily on content and backlinks while overlooking broken crawl paths, slow page loads, and indexing errors that prevent Google from ever seeing their best pages. Running a thorough website SEO scan reveals these problems in a structured, prioritized format so you can act on them immediately.
The difference between a site ranking on page one and one buried on page five often comes down to technical health. This guide walks you through four concrete steps to scan your entire site, interpret the results, and fix what matters most. Whether you manage a 50-page business site or a 50,000-page ecommerce catalog, the process scales. By the end, you'll have a repeatable system to maintain peak technical performance and improve search rankings consistently.
Key Takeaways
- Run a full technical SEO audit at least once per quarter to catch emerging issues early.
- Prioritize crawl errors and indexing problems before addressing page speed or schema markup.
- Use automated crawl tools alongside manual checks for the most accurate site crawl analysis.
- Fix SEO errors in batches grouped by severity to maximize impact with limited development time.
- Monitor your SEO health check metrics monthly to prevent regressions after fixes go live.
Step 1: Prepare Your Site for a Technical SEO Audit
Gather Your Baseline Data
Before you start scanning, pull your current performance numbers from Google Search Console and your analytics platform. Note your total indexed pages, average crawl stats, Core Web Vitals scores, and any manual actions. These baselines let you measure the real impact of your fixes later. Without them, you're flying blind, you might fix 200 errors and have no way to prove the effort moved the needle.
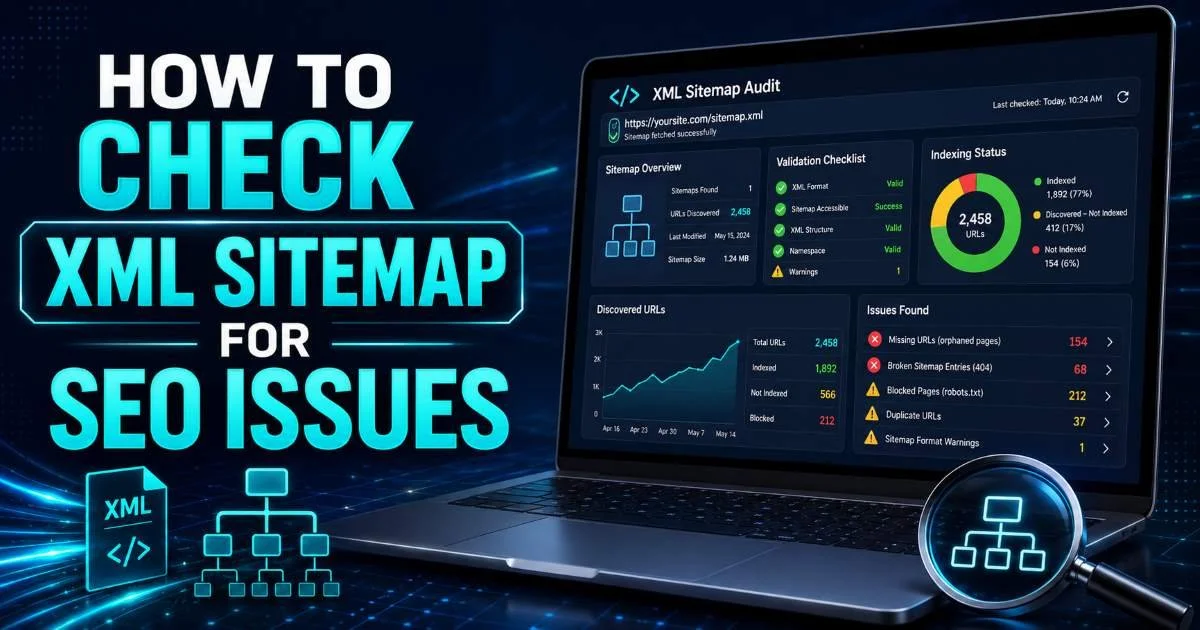
Export your current sitemap and compare it against your actual URL inventory. Sites frequently have orphaned pages that appear in no sitemap and receive no internal links, or sitemap entries pointing to redirected or 404 URLs. Google treats a messy sitemap as a weak signal about your site's organization. Clean it up before the crawl so your scanner reflects reality, not outdated artifacts from a previous site migration or CMS update.
Check your robots.txt file carefully. A single misplaced disallow directive can block an entire subdirectory from crawlers, and these mistakes persist for months without anyone noticing. Verify that your staging environment isn't accidentally exposed to search engines, a surprisingly common issue where duplicate content from a staging subdomain dilutes your main site's authority. For a deeper understanding of what technical SEO covers, WebFX's technical SEO overview breaks down the fundamentals well.
Screenshot your Google Search Console coverage report before scanning. This becomes your "before" snapshot for measuring progress.
Choose the Right Scanning Tool
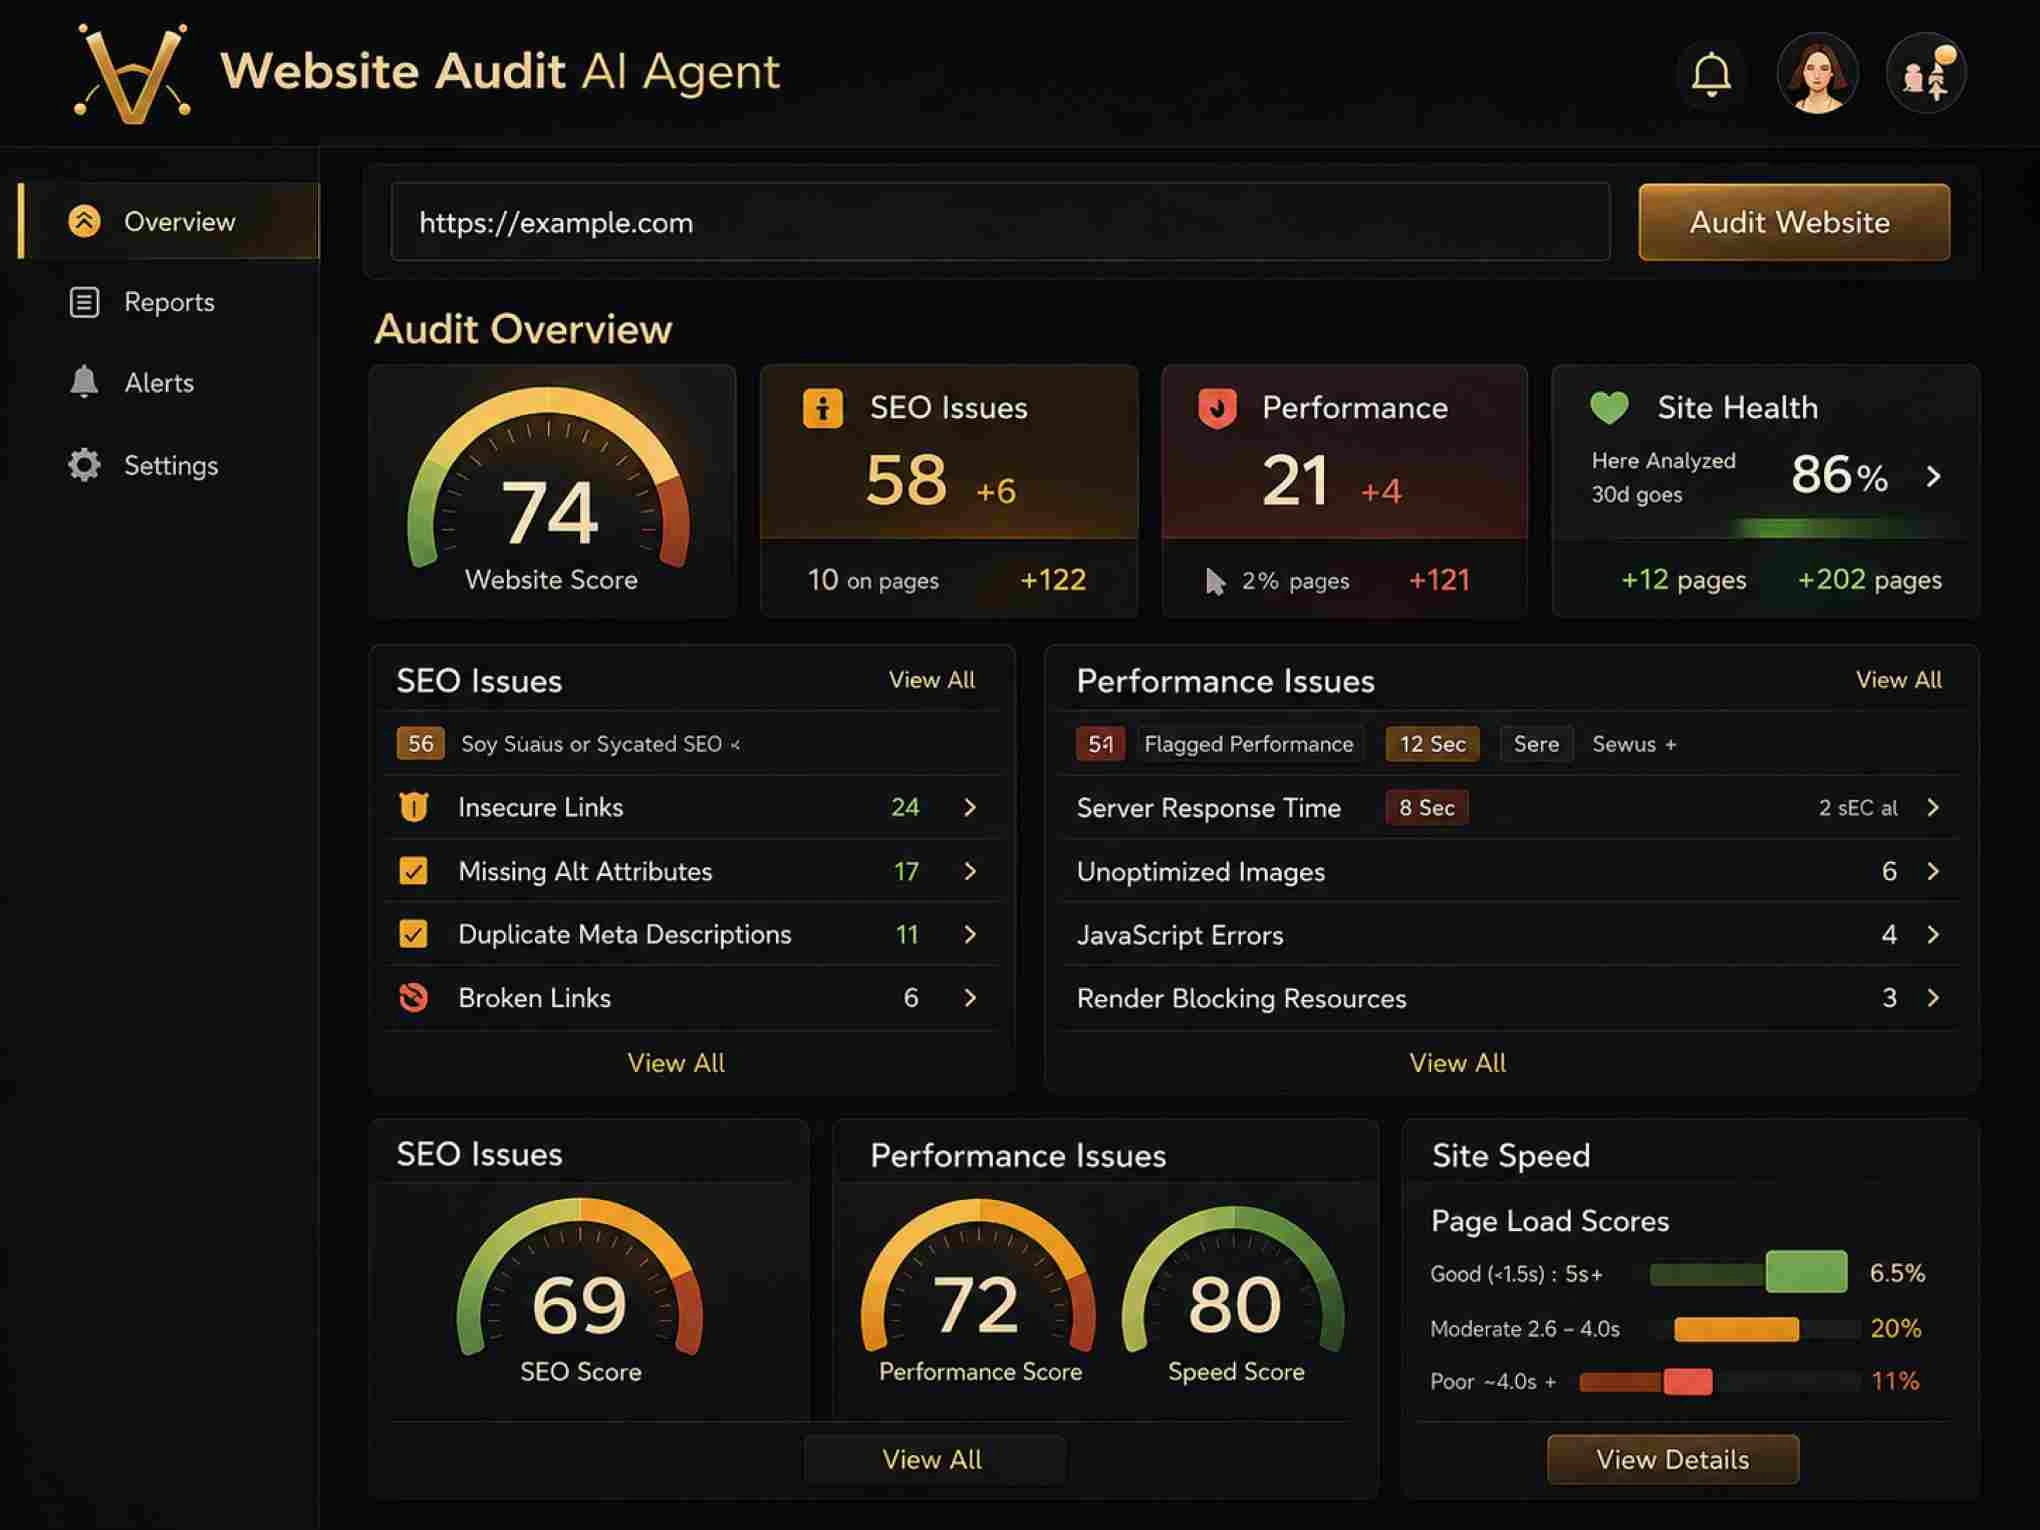
The tool you pick matters less than how thoroughly you configure it. Website Audit provides a fast, AI-powered approach that surfaces prioritized recommendations rather than dumping raw data on your lap. Desktop crawlers like Screaming Frog give granular control for large sites, while cloud-based options work better for teams that need shared access to results. Match the tool to your site's size and your team's technical comfort level.
Step 2: Run a Comprehensive Site Crawl Analysis
Configure Your Crawl Settings
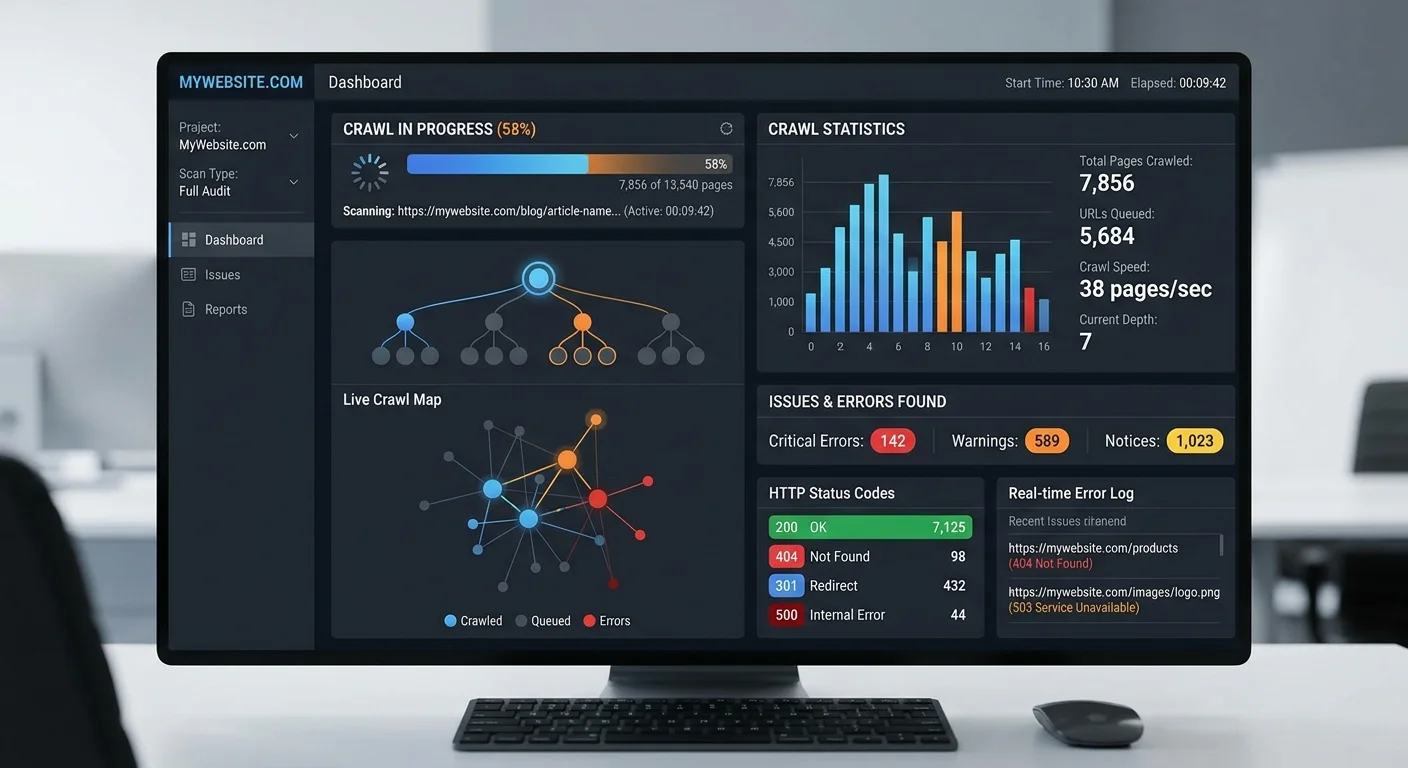
Don't just hit "start" with default settings. Set your crawler's user agent to Googlebot to see exactly what Google sees. Configure the crawl speed to avoid overwhelming your server. Most shared hosting plans buckle under aggressive crawl rates, which ironically creates the same timeout errors you're trying to diagnose. Set a crawl depth limit that matches your site architecture; for most sites, five to seven levels deep captures everything meaningful.
Include JavaScript rendering in your crawl if your site relies on client-side frameworks like React, Angular, or Vue. A standard HTML-only crawl misses content that loads dynamically, which means your site crawl analysis would paint an incomplete picture. Google renders JavaScript, but it does so on a delayed schedule, and rendering errors can prevent content from being indexed entirely. About 65% of modern websites use some form of JavaScript rendering, making this step non-optional for most audits.
JavaScript rendering during crawls increases scan time significantly. For sites over 10,000 pages, consider running a JS-rendered crawl on a representative sample first.
What the Crawl Reveals
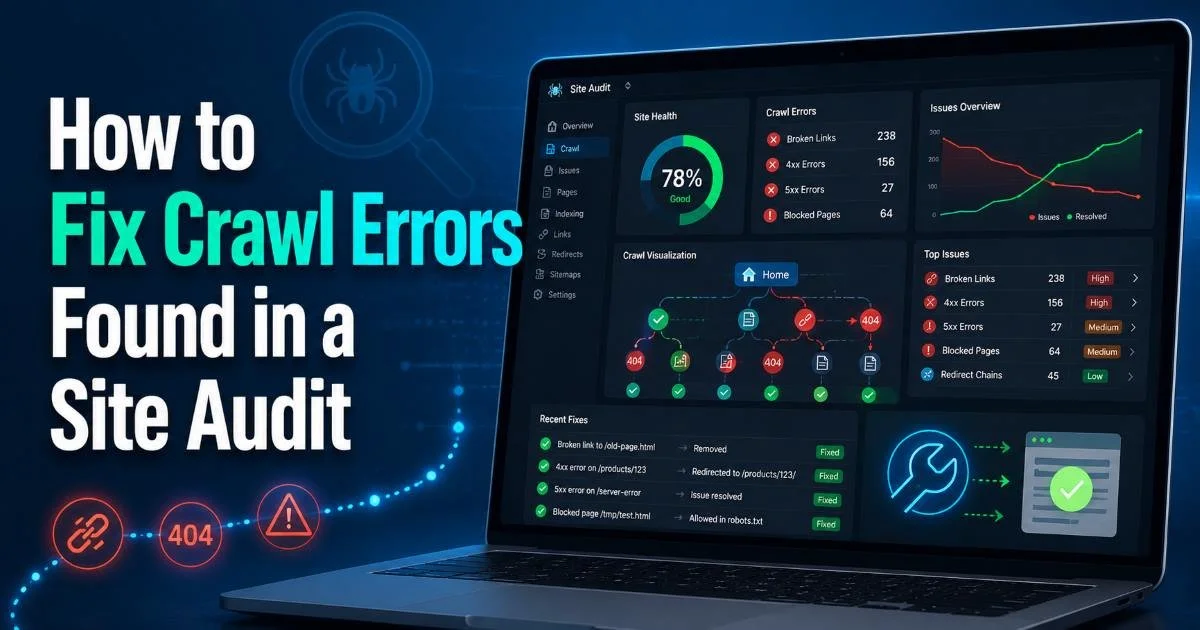
A thorough crawl produces data across several categories: HTTP status codes, page speed metrics, meta tag analysis, internal linking structure, image optimization, structured data validation, and mobile usability. The volume of data can feel overwhelming, which is exactly why automated tools that categorize findings by severity save hours of manual sorting. Focus on the summary dashboard first. The ratio of errors to warnings to passed checks gives you an instant SEO health check reading.
Pay special attention to response code distribution. A healthy site returns 200 status codes for the vast majority of URLs. If you see more than 2-3% of URLs returning 3xx redirects, 4xx client errors, or 5xx server errors, you have structural problems that need immediate attention. Redirect chains longer than two hops waste crawl budget and dilute link equity. Every 5xx error represents a page that Google tried to access and couldn't—repeated failures cause Google to crawl your site less frequently overall.
Step 3: Interpret Results and Prioritize Fixes
Severity-Based Prioritization
Not all errors deserve equal attention. A missing canonical tag on your homepage carries far more weight than a missing alt attribute on a decorative footer image. Group your findings into three tiers: critical issues that block indexing or cause significant ranking loss, warnings that degrade performance or user experience, and notices that represent best-practice improvements. Tackle them in that order. This approach lets you fix SEO errors efficiently even when development resources are scarce.
Critical issues include noindex tags on pages you want ranked, broken canonical tags pointing to non-existent URLs, server errors on high-traffic pages, and mobile usability failures. Warnings typically cover slow page loads above three seconds, missing or duplicate meta descriptions, thin content pages under 300 words, and excessive redirect chains. Notices include opportunities like adding structured data, optimizing image file sizes, and improving internal link distribution across deeper pages.
"The sites that rank best aren't the ones with perfect content—they're the ones with the fewest technical barriers between their content and Google's index."
Common Issues and Their Impact
| Issue Type | Severity | Typical Ranking Impact | Average Fix Time |
|---|---|---|---|
| Blocked by robots.txt | Critical | Pages completely deindexed | 15 minutes |
| Missing canonical tags | Critical | Duplicate content penalties | 1-2 hours |
| Broken internal links | High | Wasted crawl budget, lost link equity | 2-4 hours |
| Slow page load (>3s) | High | Lower Core Web Vitals scores | 4-8 hours |
| Missing meta descriptions | Medium | Lower click-through rates | 1-3 hours |
| Missing image alt text | Low | Reduced image search visibility | 1-2 hours |
| No structured data | Low | Missed rich snippet opportunities | 2-4 hours |
Use this framework to build a realistic sprint plan. If your development team has 20 hours available this month, start with the critical and high-severity rows. The quick wins—like unblocking pages from robots.txt—often produce visible ranking improvements within days of Google's next crawl. Slower fixes like page speed optimization require more investment but compound over time as Core Web Vitals become an increasingly weighted ranking signal. Monitoring tools like those covered in this AI agent monitoring guide can help track automated fix verification across large sites.
Never batch-fix hundreds of redirects at once without testing first. A single regex error in redirect rules can take your entire site offline.
Step 4: Fix SEO Errors and Verify Improvements
Implement Fixes Systematically
Create a tracking spreadsheet or project board with every issue, its URL, severity tier, assigned owner, and status. This sounds like overhead, but technical fixes have a frustrating tendency to break other things. A redirect fix might resolve one broken link while creating a new redirect chain elsewhere. Systematic tracking prevents the whack-a-mole pattern that plagues most technical SEO audit efforts. Group similar fixes together—update all missing canonical tags in one deployment, all broken links in another.
For page speed issues, start with the highest-traffic pages. Compress images using WebP format, implement lazy loading for below-the-fold content, minify CSS and JavaScript files, and enable browser caching. These four changes alone typically reduce load times by 40-60% on content-heavy sites. If your site runs on WordPress, audit your plugins—deactivating just three or four unused plugins can shave a full second off load times. Test every change in a staging environment before pushing to production.
Address crawlability issues by fixing your internal linking architecture. Every important page should be reachable within three clicks from the homepage. Use breadcrumb navigation to reinforce hierarchy. Update your XML sitemap to reflect only indexable, canonical URLs with 200 status codes. Submit the refreshed sitemap through Google Search Console and request indexing for your highest-priority fixed pages. Google typically re-crawls submitted URLs within 24-48 hours, though full reindexing of a large site takes weeks.
After implementing fixes, use Google's URL Inspection tool to test individual pages before waiting for a full re-crawl.
Verify and Monitor Ongoing Health
Run a second full crawl two weeks after your fixes go live. Compare the results against your initial scan to quantify improvement. You should see a measurable drop in critical errors and an increase in your overall site health score. If certain issues persist, investigate whether your CMS is regenerating them—some platforms recreate duplicate meta tags or broken links automatically when content gets updated. Your goal is a clean technical SEO audit score that stays clean.
Set up automated monthly scans through Website Audit to catch regressions before they accumulate. New content, plugin updates, server migrations, and CMS upgrades all introduce fresh technical problems. A monthly SEO health check catches these issues when they're still small and easy to fix. Track your Search Console data alongside your audit scores to correlate technical improvements with actual ranking gains. Over three to six months, this data builds a compelling case for ongoing investment in technical SEO maintenance.
Frequently Asked Questions
?How do I fix orphaned pages found during a site crawl analysis?
?Is automated crawl tool data enough, or do I need manual checks too?
?How long does a full technical SEO audit take for a large ecommerce site?
?Can a messy sitemap actually hurt my rankings, or is it just housekeeping?
Final Thoughts
A technical SEO audit isn't a one-time project; it's a recurring practice that keeps your site visible and competitive. The four steps outlined here give you a repeatable framework: prepare your baseline, run a thorough scan, prioritize by severity, and implement fixes systematically. Every quarter, repeat the cycle. Sites that maintain this discipline consistently outperform competitors who treat technical health as an afterthought. Start your first scan today, and let the data guide your next move.
Disclaimer: Portions of this content may have been generated using AI tools to enhance clarity and brevity. While reviewed by a human, independent verification is encouraged.